
라미_홈's post
1 / 7
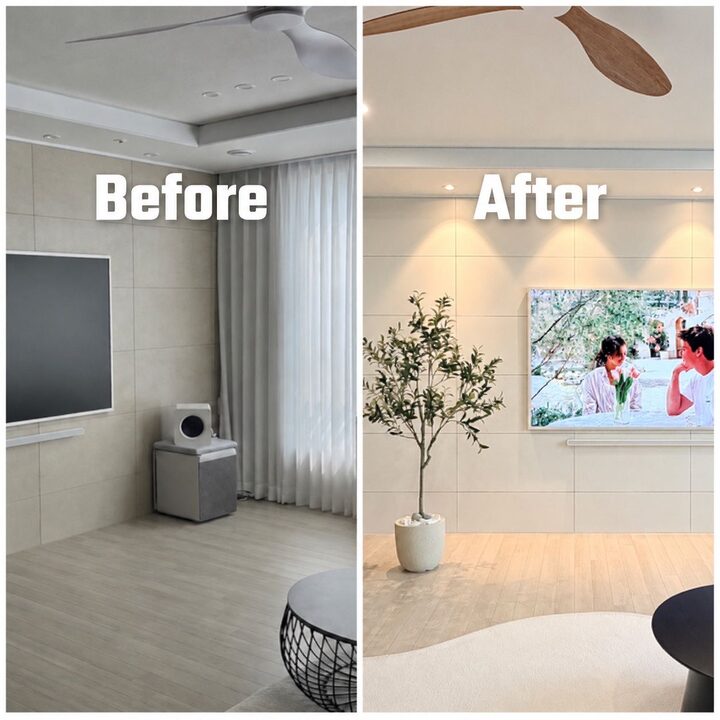
I kept being bothered by the glossy gray tile accent wall, so I decided to apply interior film myself 😊 Applying the soft cream-colored matte film made the living room feel much brighter and warmer. The most important things during installation were removing dust and air bubbles. I wiped the tile surface clean and attached the film one sheet at a time, aligning it along the grout lines. Instead of sticking it all on at once, it looks much neater if you just lightly secure the top and then use a squeegee to smooth it out from the center. I found that applying a little heat with a hairdryer to the corners improved adhesion. I'm very satisfied with just changing the film without any major renovations, and it wasn't as difficult as I thought!! 👍 ✅ Pre-treatment Supplies 🧰 1. Brush - Used to apply a thin layer of primer 2. Sandpaper - Roughens the surface of glossy tiles to increase adhesion 3. Primer - An adhesive aid that helps the film adhere well 4. Silicone - Trims edges, gaps, and finishing lines 5. Silicone Stick - Presses the silicone neatly to shape it ✅ Installation Supplies 1. Spatula - Removes existing silicone and trims corners 2. Knife Refill - Replaces blades for cutting the film 3. Film Squeegee - Removes air bubbles when applying the film 4. Wool Squeegee - Smooths the surface to prevent bubbles and wrinkles 5. Interior Film ✅ Key Points for DIY Success * Always dull the shine on glossy tiles with sandpaper * Apply primer thinly, focusing on the edges * Apply the film little by little, not all at once * Always use a new blade * Use low heat from a hairdryer for corners * Finish with matte silicone (Ardex recommended) * Use masking tape for silicone and apply it in one go #ArtWallDecor #기록챌린지 #거실인테리어 #아트월 #ArtWallInterior #아트월꾸미기 #셀프인테리어 #인테리어필름시공 #필름시공 #pnc47
- 07.07
- Likes
- 130
- Saved
- 72
- Views
- 325
Comments0
