
이진주110's post
1 / 9
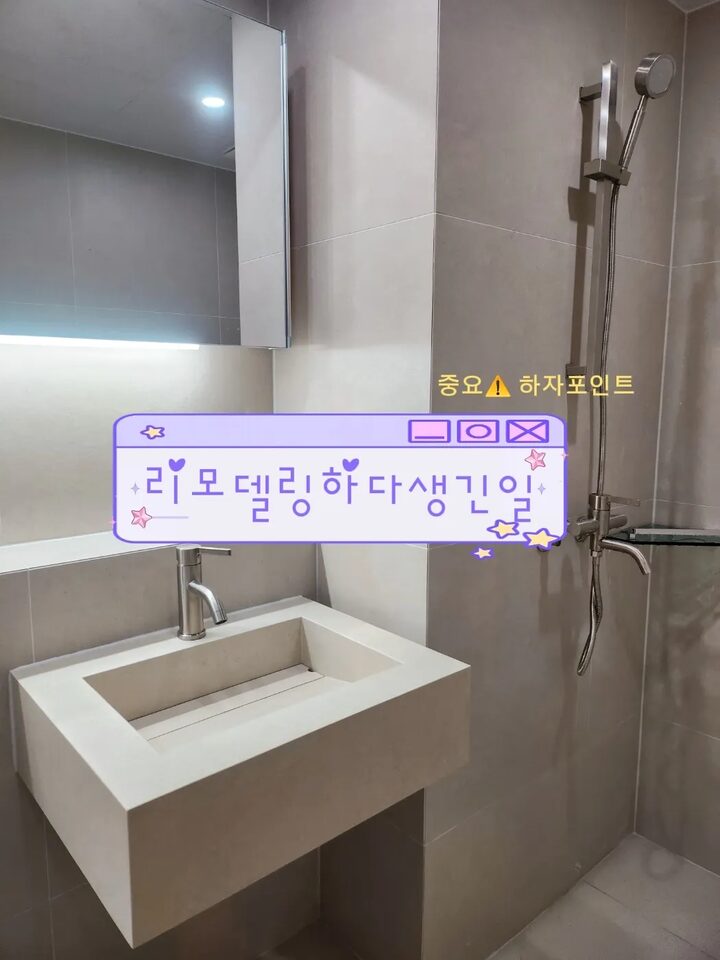
🤍 Before Remodeling The existing tiles were cracked in several places, and being an old bathroom, it looked worn out overall. I decided that doing the renovation all at once would be more efficient than doing partial repairs. ✅️ Demolition and Waterproofing All existing tiles were removed. Instead of completely tearing out the waterproofing layer, we applied a new layer of waterproofing on top of the existing one. The reason for this was that I believed it was safer to reinforce the waterproofing performance while maintaining the structure of the existing layer. Since we would have to compensate for everything if there were any leaks, this was the part I considered the most important✅️✅️ 🙊‼️ Hidden Defects Discovered During the additional waterproofing work, a crack was found, so we received additional repairs. For those remodeling, waterproofing is a critical part, so I think you should definitely take photos and inspect it periodically. 🫶 Construction Highlights (Tile Selection) We selected 600×600 matte beige tiles. By using the same tiles throughout the entire bathroom, we created a one-tone look, which also had the effect of making the space look much larger. Above all, since this tile was manufactured using the same product as the tile-type vanity, I was able to create a unified design without having to fabricate a separate tile vanity. I was also satisfied with the cost-effectiveness, as it saved on production costs. 💙 Overall Concept I aimed for an overall atmosphere that is as modern and simple as possible. I unified the faucets, showerhead, and towel rack with matte finishes, choosing a silver color with a subtle champagne gold tint. I liked the atmosphere; when combined with the beige tiles, it was neither too flashy nor too cold. 💙 Shower Area I installed a glass corner shelf in the right corner. It was spacious enough to hold shampoo and body wash, and it was convenient to use. I considered a built-in shelf, but decided on the glass shelf because it would have cost about 500,000 won extra, and I was ultimately very satisfied with the result. ✅️ In particular, since the grout lines of a built-in shelf are exposed to items or water, they are bound to get damaged and require continuous repairs. Therefore, a glass shelf, which is easy to replace, was the more reasonable choice! 💙 Mirror Cabinet I chose a mirror cabinet that is entirely made of mirror. It created the effect of making the bathroom look larger than it actually is and allowed me to secure ample storage space. I even added indirect lighting to the base to create a soft atmosphere even at night. 💙 Total Cost The total cost for the remodeling, including the removal of existing tiles, waterproofing reinforcement, tile installation, sink, mirror cabinet, and faucets, was approximately 4 million won. I thought this was a reasonable price for a full renovation, and the result is a bathroom that satisfies both design and practicality. Since this is a space I will be using for a long time, I was even more satisfied with the remodeling. #CornSoupRecords #콘수프기록 #오늘의집 #욕실리모델링 #욕실인테리어 #욕실공사 #베이지인테리어 #모던인테리어 #욕실타일 #600각타일 #무광타일 #베이지타일 #타일형세면대 #세라믹세면대 #거울장 #욕실수납 #간접조명 #유리선반 #샤워부스 #샤워공간 #무광수전 #샴페인골드 #실버수전 #인테리어기록 #집꾸미기 #리모델링후기 #홈인테리어 #신혼집인테리어 #욕실꾸미기 #리모델링하다생긴일
- 08.06
- Likes
- 20
- Saved
- 8
- Views
- 115
Comments0
